A Pattern Language for Heroes IV Maps
a.k.a. how to design a map for Heroes of Might and Magic 4. Based on my observations of the maps that come with the game and my experiments with mapmaking.
Regions
A region is an area of the map with a consistent terrain type.
- A small map should have about 2–4 regions (per "plane", i.e. above ground or underground)
- A medium map, with four times the area, should have about 8–16
- A large map, 18–36
- An extra-large map, 32–64
A region can be land or sea. If you are making a map with a coastline, lakes, or inland seas, each body of water is a region.
The regions do not need to be the same size! They can vary quite a bit. The ratio between the smallest and largest can be 4:1 or perhaps more.
Each region should be a coherent shape — [Positive Space].
Here is an example: regions I drew for the map "Battle of the Bards". This is an extra large map. Counting water regions, there are around 30 regions all told.
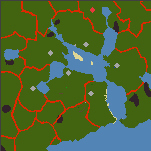
Positive shape is enhanced by local symmetries. In the picture below, I shaded some of the sub-regions that are roughly symmetric. You can see that the symmetric shapes are not always the entire region — hence the emphasis on local symmetries.

To enhance positive shape and give you more opportunities for symmetry, a few good rules of thumb are:
- Always make 3-way junctions between region borders. Avoid making "cross" or "star" intersections where 4 or more regions meet at a point.
- Make borders meet at right or obtuse angles — around 90 or 120 degrees. Squares and hexagons fit together nicely.
- Build up regions by overlapping almost-rectangular or almost-hexagonal shapes. Trapezoids are good too.
Regions that are simply "left over" after brushing in the terrain for the other regions tend to have negative/bad shape. To counteract this, go back and forth between adjacent regions as you brush, expanding and adjusting each until the whole configuration looks good. Making the regions interlock or interpenetrate can help — Deep Interlock.
Don't rush this step. Awkwardly-shaped regions will haunt you the whole time you're building and playing the map. Take your time and keep working at it until you're satisfied with every region.
This investment will pay off later. In particular, one of the benefits of positive shape, besides aesthetics and ease of fitting in adventure objects and pathways, is that it means you can subdivide or combine regions if you find they're too small or too big, and still end up with positively-shaped regions as a result.
Terrain Types
Once you have outlined each region, brush in a single terrain type per region. This will be the dominant terrain in that region. When choosing a terrain type for a region, prefer those that contrast with adjacent regions.
You can subdivide or merge regions at this point, maintaining [Positive Space] — see Regions.
Regions with movement-limiting terrain (rough, snow, sand, swamp) should be smaller and have tighter spacing — Rhythmic Spacing. If you are working on a small map, using terrain to limit movement makes the map feel larger. This technique was used to good effect in the map The Ultimate Mug of Ale.
Here is an example, from the development of my map, Battle of the Bards. You can see that I've tweaked some regions from the map above, subdividing some and slightly changing the shape of others.
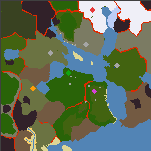
About half the land area is grass and dirt terrain, which impose no movement penalty. Note that I want most of the swamp, snow, rough, and volcanic regions to feel large and difficult to traverse — they will be Contested Regions loaded with goodies and monsters.
As I fill in the terrain, I'm at least somewhat aware of how I want the gameplay to go and what stories I want to tell in each region. E.g. the swamp region at the lower left is the "pirate region". The red player will be Might and have a viking-ish aesthetic. Etc. I've made small volcanic regions to house strategic items that players will quest for as they transition into the midgame.
After brushing in the terrain, you should stand back a bit and squint at the minimap to get a sense of its overall character. I like my maps to have a natural, weathered-looking roughness. I think this one does pretty well.
The way you get this "natural" look is, as stated earlier, seeking positive shapes with local symmetries, varying the region size, and then brushing in terrain so adjacent regions contrast.
Folded Boundaries
- Use an obstacle brush to create boundaries between the regions.
- Each boundary should be "folded" into a zigzag or wiggle, with many peninsulas and nooks. These will be filled by monsters and treasure. See: Deep Interlock, Alternating Repetition.
- The entire center formed by the boundary can be quite thick: 10 tiles or more.
For an example, see the map Harpy Horde.
See Mountains Above, Trees Below for how to brush an obstacle center.
Rhythmic Spacing
Each region of the map should have a more or less consistent spacing. This spacing determines two structural properties of the map:
- the width of the major paths players will take as they travel around the map — [Rooms and Paths].
- the distance between interactive centers.
Spacing affects the pace of the map. A tight spacing means you can do more in one turn, and makes budgeting your movement more important. Looser spacing creates a more relaxed feel. Small maps tend to have a tighter spacing.
The minimum spacing is about 2–4 tiles (Danger in the Trees is an example of a map with very tight spacing). A spacing of 8 tiles is typical for maps of medium size and up. The spacing should not be larger than 8, because an army's scouting distance is generally only 7 or 8 tiles. If you can't see nearby encounters and obstacles from where you are, you can't navigate.
Spacing should be approximately consistent within a region. Don't be too rigid about it. See: blue noise.
This pattern implies that the width of a path should be roughly equal to the spacing of interactive centers along that path. If you space interactions tighter than the path width, it feels unnatural — more like a strip mall than a natural landscape. Interactions can occasionally be spaced looser than the path width to give a tunnel-like effect.
Encounters and Obstacles
This section tells you how to fill in a region with:
- obstacles like mountains, trees, and rocks
- encounters — groups of interactive objects that can include monsters, buildings, and treasure.
There are multiple sequences you can follow to do this.
- Seq 1. Droplets (A Land Without a King, Zanfas's Challenge)
- Seq 2. Paths and Walls (Danger in the Trees, Dungeon Crawl, Forest Frenzy, Seven Steps to Glory)
- Seq 3. Main Path and Branches (Harpy Horde, Beebee and the Three Pigs, The Ultimate Mug of Ale)
What should you put in each encounter? To answer this question, see: Starting Regions, Level Variety, Level 1 Encounters, Level 2 Encounters, Level 3 Encounters, Level 4 Encounters. For ideas on how to place monsters, see: Guarded Areas, Shortcut Guards, Alternative Fights.
Droplets
This sequence is good when you want to create an "open world" map, where the player has a lot of choice in where to go and the order in which to take fights. It has the benefit of being easy to execute, and it results in a map that's easy to tweak later.
Steps:
- Scatter encounters around the region, maintaining Rhythmic Spacing.
- Add obstacles next to (usually above) each encounter to create a "droplet" of impassable terrain.
Risks:
- Players can feel like they don't know where to go next. It can feel like the map doesn't have an overall narrative arc.
- The map can feel too samey. Example: Field of Life.
- PvP can suffer, devolving into armies chasing each other around in circles.
Paths and Walls
This sequence is good when players will be skirmishing over towns and mines, and you need to control the distance between those landmarks.
Steps:
- Use the Road tool to mark out a network of paths that players will follow. Adhere to Rhythmic Spacing when deciding how close together paths can be.
- Add encounters along and between the paths and at the ends of branches, following Rhythmic Spacing.
- Fill the space between the paths with obstacles.
- Delete any roads you don't want.
Risks:
- This style of map can feel artificial.
- It can be a lot of work to remodel this type of map when playtesting reveals flaws.
Main Path and Branches
This sequence is good when you are creating a story-based map, or want to give players a clear set of choices for where to go. The branch paths give you a natural place to put sequences of fights of increasing difficulty.
Steps:
- Use the Road tool to draw the main path(s) in one type of road — say, cobble. The main paths should connect to neighboring regions. They may form loops. Small loops — just big enough to encircle one structure — can be quite frequent. Bigger loops should be less frequent. There should not be any dead ends in the main path.
- Use a different type of Road — say, dirt — to create secondary paths branching off the main path. Follow Rhythmic Spacing.
- Add encounters along and between the paths and at the ends of branches, following Rhythmic Spacing.
- Fill the space between the paths with obstacles.
- Delete any roads you don't want.
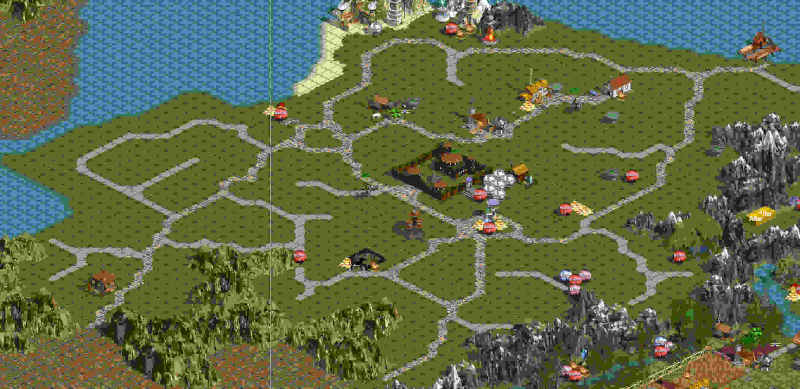
Here is an example of how a region might look after the first two steps (drawing roads), from my map Battle of the Bards. The spacing is 7. Ignore the encounters — they are left over from a previous attempt at filling this region.
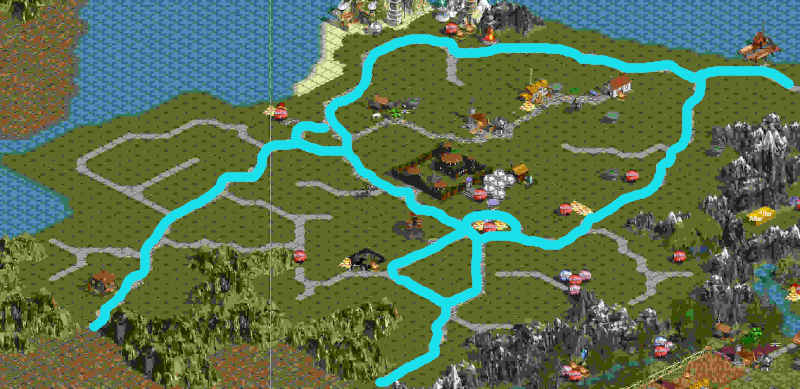
The image below shows the main path highlighted in blue:
Starting Regions
- Choose a region for each player to start in
- Place a town in each starting region
- If the town is placed close to the center of the region, the map can feel more "open world" and less railroaded than if it is placed in a corner. That can be a good or a bad thing depending on what you're aiming for.
Near each town, place an Ore Pit and a Sawmill, and a couple resources next to each. They can be unguarded, or guarded by level 1 monsters — Level 1 Encounters.
Pretty much everything else about the starting region is up to you, but keep in mind that in the early game, players will want:
- Resources
- Treasure chests
- XP boosters (Learning Stone, Dream Teacher)
- Creature dwellings
- Skills (Witch's Hut, Beastmaster's Hut, School of Magic/War, etc.)
- Spells
- Basic items like armor and bows
- Temporary buffs
- Mana replenishment
You may want to throw in some stat upgrades, treasures, and minor artifacts as well, but these aren't as essential.
Freebies
- reward exploration.
- structures that cost gold or other resources to use don't always need to be guarded. E.g. creature dwellings, schools of magic, Tree of Knowledge.
- structures that give temporary buffs are often unguarded.
- at a minimum, scatter random resources and campfires around the map.
- in the farther reaches of the map, you can give away treasures, skill altars, and stat gems.
Level 1 Encounters
There should be about 5 level 1 monsters close to each player's starting town, and perhaps 9 per player for the whole map. (See: A Land Without a King, which has 3 players and 27 random level 1 monsters.)
When determining the reward for a level 1 fight, consider what the player is most likely to want early in the game: resources, creatures, low-level spells, and basic items like bows, armor, and potions.
One way to gauge the reward for a fight is to use a point-buy system. See Treasure Point Values.
Level 1 monsters generally should not guard the following reward types; they are too valuable:
- daily rare resource mines (gem, crystal, mercury, sulfur) — see Level 2 Encounters. Weekly mines are okay for level 1.
- gold mines — see Level 3 Encounters
- minor or major artifacts — see Level 3 Encounters and Level 4 Encounters.
When placing level 1 monsters, leave room for a few level 2s — Level Variety.
Level Variety
Avoid clustering together too many fights at the same level. It limits strategic decision making if the sequence of fights is too obvious: walk down the road, fight 5 level 1s, then 5 level 2s, etc. Instead, you want the player to be weighing options and tradeoffs. Can I take this fight now? Can I afford to come back later?
Having a variety of monster levels in an area also makes the fights less repetitive, as YouTube user Finkellll points out.
Still, each region of the map will have a dominant encounter level. As a rule of thumb, aim to make about 20–30% of the fights in an area off-level. If you have 5 level 1 fights, mix in a couple of level 2s.
Most of the time, adjacent fights should be at most one level apart. The exception is when you want to draw the player's attention to something that is important but inaccessible till later in the game — Glimpses of the Future. That's when you put a level 4 monster next to the starting town.
Off-level fights should give above-average rewards for their level, to increase the incentive to return to an already-visited area or take a fight early.
Guarded Areas
When placing monsters, consider what tiles they are guarding. There's no point having monsters guard tiles with nothing on them. Conversely, if you intend for a monster to guard an object, make sure it is actually guarding it.
Every monster guards a 5x5 square area centered on the monster. It will attack armies that enter this area (unless the army has the stealth skill at a level that allows it to sneak past). Note that armies can pick up treasure and interact with buildings on adjacent tiles, so if an army is standing 3 squares away from a monster, it can pick up items inside its guard area.
To check your guard areas, toggle on the passability display in the map editor to see which parts of each object are interactive. Interactive sides and corners of an object are those that touch the yellow triangles. An army on the tile directly opposite an interactive side or corner can interact with the object.
Consider how the Stealth skill will interact with your guards. The way you set up guards can make Stealth overpowered or underpowered. A hero with Grandmaster Stealth can stand on the tile next to any monster without being attacked, so they can steal anything that isn't in a 1x1 nook directly behind the monster.
Alternative Fights
When a path is between 4 and 10 tiles wide, you have the opportunity to block it with a pair of monsters in such a way that defeating either monster will let the player pass through. Each monster can also guard its own cache of treasure.
For example, see the image below, from the map Seven Steps to Glory. Defeating either of these monsters will let the player pass by on the road.
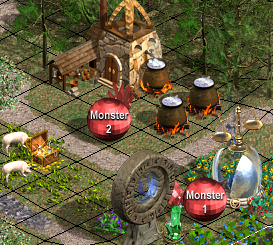
This is an easy way to create a (hopefully) interesting decision for the player to make. Which fight is easier?
Glimpses of the Future
One of the things that makes Heroes games fun is the sense of progression. You start out not being able to do a thing, and then later, as your heroes level up, you find you can do the thing.
To give players a sense of progression, you want to occasionally show them an area they can't access yet, or a monster they can't fight yet. The Window of the Magi structure does this in a very deliberate way, and is often used by mapmakers to draw the player's attention to plot-relevant areas. But you can also use the normal scouting radius of armies or towns to lift the shroud on a late-game area. An example of this occurs at the beginning of In War with the In-Laws. You can see across the mountains to a region that you won't be able to explore until the late game.
Even more simply, you can put a level 4 monster guarding a major artifact in a player's start area.
Level 2 Encounters
Level 2 creatures often guard rare resource mines (gem, crystal, mercury, sulfur) and random treasures. See also Treasure Point Values.
Level 3 Encounters
Level 3 creatures often guard gold mines and minor artifacts. See also Treasure Point Values.
Level 4 Encounters
Level 4 creatures often guard major artifacts. See also Treasure Point Values.
Free Path
Shortcut Guards
Monsters don't only have to guard treasure. Another valuable reward is a shortcut between different areas of the map.
The most dramatic example of this is when you have a monster guarding a portal. But you can also put guards on smaller shortcuts that are simply paths between obstacles. If a player can cut a day off their journey by fighting a monster on the way, it might be worth taking the fight. You can throw in some treasure too, to sweeten the deal.
Contested Regions
Contested regions are any passable region that isn't a player's start region. They are often designed for PvP (player-versus-player) combat. They can also have PvE (player-versus-environment) elements that reward players who get there first.
Often, you'll want to structure the map so players must pass through a contested region before they can get to another player's start region. In any case, you want contested regions to be accessible from multiple players' start regions. Otherwise, they're not really contested.
Contested regions often contain:
- level 3 and 4 monsters
- artifacts
- buildings that provide temporary buffs
- gold mines and other high-value resource mines
- high-level creature dwellings
- high-level spells (shrines, conservatories)
- skill altars
- towns
- trading posts
- loops or circuits in the path
- chokepoints
- garrisons
- sanctuaries
The point is, you want players to be racing to these regions and fighting over what's in them.
Dungeons
A dungeon is a kind of contested region which
- is small
- is designed for PvE, not PvP
- contains monsters and lots of treasure.
Players will race for these dungeons, but won't usually fight in them. Dungeons are thus a way of creating indirect conflict on a map.
Often, players can see dungeons before they can reach them, via Windows of the Magi or shroud towers — Glimpses of the Future. They need to get an idea of what's in the dungeon so they know whether they should go for it.
It may be unwise to put only random items in a dungeon. To motivate players to explore the dungeon, you want a couple really good, hand-picked items. Which items should go in a dungeon depends on the strategies you think will be good on the map. Imagine a few different hero builds for each alignment and choose items that go well with those.
Grass
Unless there's rain or a sprinkler system keeping it wet, grass quickly dries out and turns yellow in direct sunlight. To make a mediterranean-looking grass area, use lush grass terrain in the following places:
- under trees
- next to mountains that have bright green grass at the bottom of their slopes
- near water
- (maybe) on the north (shaded) side of mountains and trees.
Elsewhere, you probably want to use dry grass terrain.
If you are going for a fairyland / northern Europe / Ireland look, you can use lush grass almost everywhere. You still might want to use dry grass to create a "road" in the center of passable areas. This guides the player's eye and helps them see the map's structure. It's also naturalistic, since grass dies under heavy foot traffic.
Ground cover
- under trees: logs, moss,
- around interactive objects:
- rocks
- trees
- rocks + wildflowers
- next to mountains: rocks, trees
- on beaches: dunes, rocks
Sound Design
- Each area should have a consistent terrain type on passable tiles, to ensure that the music doesn't change too often. You can use a different terrain type under trees to give some visual variety.
- add birds, frogs, and pigs as appropriate.
- consider placing buildings with really annoying sound effects (e.g. the Leprechaun) away from the main path.
Mountains Above, Trees Below
- When combining mountains and trees in an obstacle center, place trees mostly on the bottom ("south") side.
- Most of the tiles that are visually obscured by a mountain are not passable. Not so for trees; they always have a one-tile base.
- Because of this, a patch of trees tends to look thicker and bigger than it really is. Terrain north of the trees might not appear passable when it is.
- When placing trees on the north side of mountains, you can place them on a tile that is already covered by the mountain. This limits the visual obstruction.
- To make terrain north of trees impassable, you can put rocks there. This technique was used in Beebee and the Three Pigs – e.g. just south of the starting town, and behind it. This variant of the technique could be called "rocks above, trees below."
A tree + rock barrier should be at least 2 tiles thick, but 3 or 4 tiles looks better.
Hills and Valleys
To make it easier for the player to see all the terrain, put obstacles (mountains, trees) in valleys or on the northern slope of hills. Example: Beebee and the Three Pigs.
Appendix: Treasure Point Values
| Guard Strength | Recommended Point Value |
|---|---|
| Level 1 | 2–6 |
| Level 2 | 4—8 |
| Level 3 | 8—20 |
| Level 4 | 16—32 |
1 point
- Random resource
- Wood
- Ore
- Gems
- Crystal
- Mercury
- Sulfur
- Gold
- Campfire
- Item or Potion
- Backpack
2 points
- Treasure chest
- Skeleton
- Medicine Wagon
- Random treasure
- Cap of Knowledge, Helm of Seeing, etc.
- Stat gem
- Stat booster building (arena, training grounds, mercenary camp, sacred fountain)
- Learning Stone
- Dream Teacher
- Tree of Knowledge
4 points
- Skill Altar
8 points
- Minor Artifact
- Mage's Chest
- Daily rare resource mine (gems/crystal/mercury/sulfur)
16 points
- Gold Mine
24 points?
- Major Artifact
- Staff